Lomorage Frame #
Install #
You can connect monitor with Raspberry Pi and use that as digital photo frame, and you can setup multiple digital photo frames using Raspberry Pi zero w and access your digital assets via WiFi.
Lomo-frame only supports on Raspberry Pi, Windows/Mac or the docker version is not supported
If you install the latest Lomorage Raspberry Pi OS image, you should already have the Lomo-frame application installed in that image.
If you don’t use Lomorage Raspberry Pi OS image, follow the instruction here to add lomoware source, then you can run the following command to install it:
sudo apt update
sudo apt install lomo-frame
Setup #
You have several options:
Run “Lomorage Photo Assistant” and Lomo-frame on the same Raspberry Pi.
Run “Lomorage Photo Assistant” on one Raspberry Pi, and run Lomo-frame on other Raspberry Pis. For example, you can run Lomo-frame on the cheap Raspberry Pi zero, and run “Lomorage Photo Assistant” on more powerful Raspberry Pi 4.
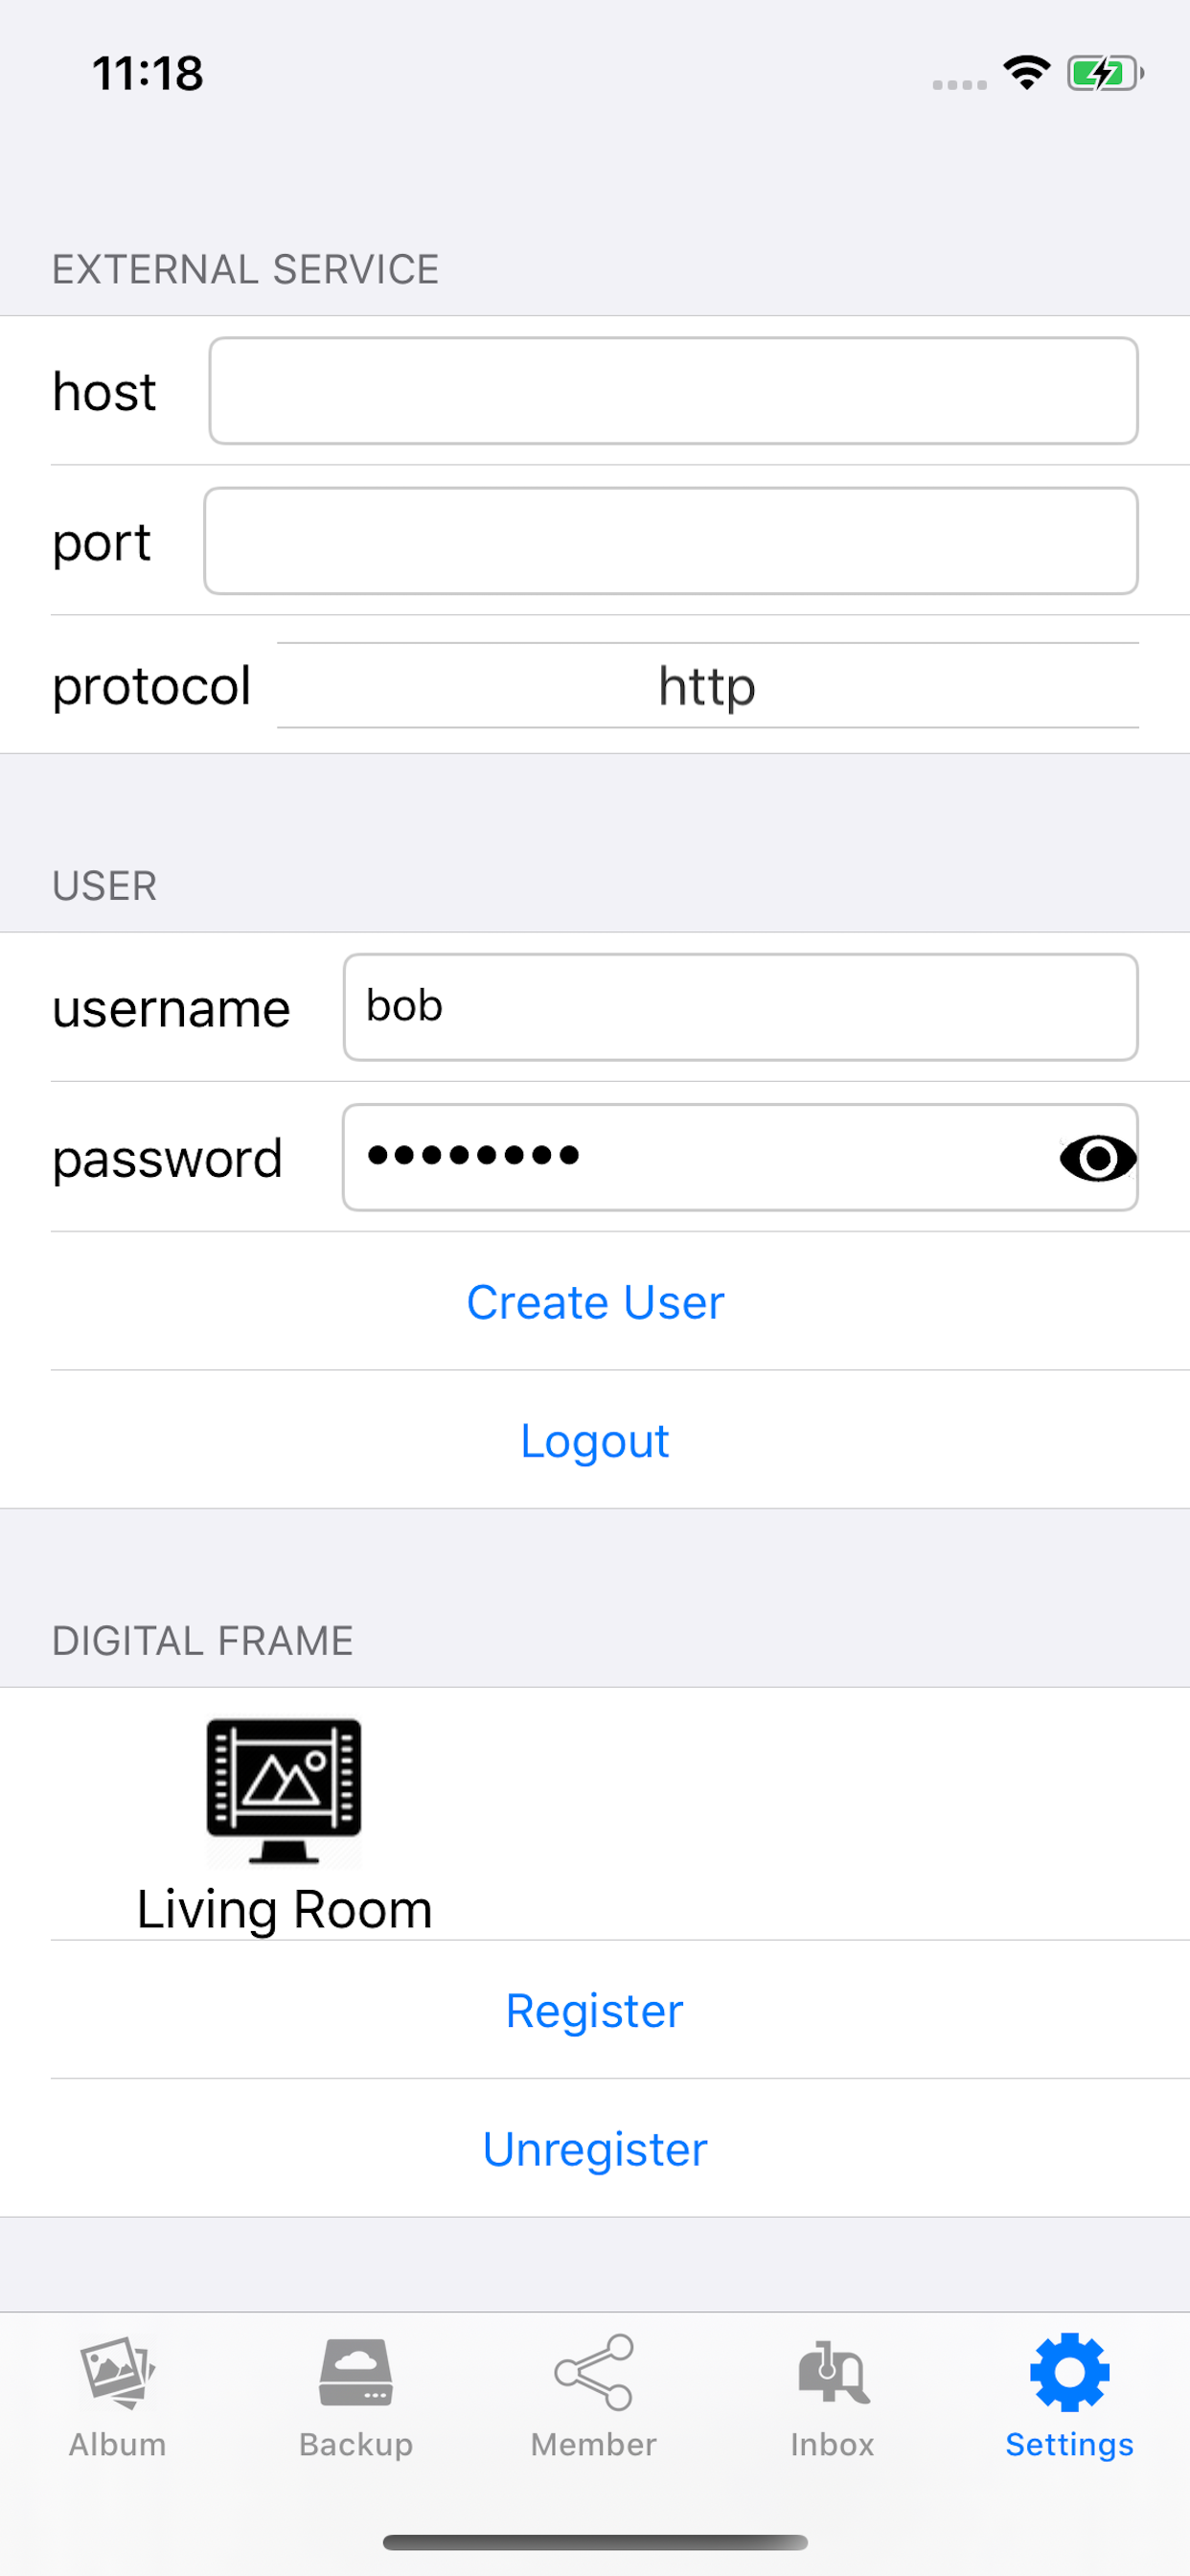
Once you have Lomo-frame running, it will show a QRCode on the screen, and you can use iOS or Android APP to register the frame in settings, once success, you can share photos with the digital frame just like share with other contacts in Lomorage APP.
Quickstart #
If you have Lomo-frame installed, it will launch on boot.
If the Raspberry Pi is not connected to the network, you need to connect it first, if you prefer to use WiFi, connect HDMI and keyboard with Raspberry Pi and reboot, follow the instruction on screen to enter in terminal and login Raspberry Pi, then you can use the command wifi_switch.sh client [wifi-ssid] [wifi-password], replace “[wifi-ssid]” and “[wifi-password]” with those of your wifi network.
You probably will have the problem that “Wi-Fi is currently blocked by rfkill”. You can confirm this by running:
pi@raspberrypi:~ $ sudo rfkill list all
0: phy0: Wireless LAN
	Soft blocked: no
	Hard blocked: no
1: hci0: Bluetooth
	Soft blocked: yes
	Hard blocked: no
And you can enable WiFi by running:
sudo rfkill unblock 0assuming 0 is the index of Wireless LAN.
After this, you can try
wifi_switch.shagain.
Once setup network, reboot and it will show a QRCode, you can go to “Settings” Tab in Lomorage iOS APP to register the frame, then you can use either Lomorage iOS APP or Lomorage Android APP to share photos with the digital frame.
If you don’t need more configuration, you can skip the below sections.
Turn Frame ON/OFF #
Lomo-frame will start after system boot automatically, but if you want manual control, you can use the following commands to turn it on: framectrl.sh on, or turn it off: framectrl.sh off. It will turn on/off the monitor as well as the Lomo-frame service.
Stop or Start Lomo-frame Service #
If you just want to quit Lomo-frame service, while keep the monitor on, you can either:
press “esc” on the keyboard if Raspberry Pi connected with keyboard.
sudo service supervisor stopif you use ssh to access Raspberry Pi.
You can use sudo service supervisor start to start the Lomo-frame service.
Schedule Frame ON/OFF time #
The default turn on time is “08:00 am”, and turn off time is “21:00 pm”.
You can change that use the following command, which changes the on time to “10:00 am” and off time to “18:00”:
framectr.sh add --on-hour 10 --off-hour 18
You can also change that to “10:30 am” and off time to “18:30”
framectr.sh add --on-hour 10 --on-min 30 --off-hour 18 --off-min 30
Or if you want to keep it on 7x24, just remove the schedule:
framectr.sh remove
Playback Order #
By default, it’s random, but if you prefer to playback sequentially:
sudo sed -i "s/is_random =.*/is_random = false/" /opt/lomorage/var/video_looper.ini
Or you can change it back to random:
sudo sed -i "s/is_random =.*/is_random = true/" /opt/lomorage/var/video_looper.ini
Customize playlist #
You can edit/create “/opt/lomorage/var/lomo-playlist.txt”, the format is one media file path per line.
Playback Media Type #
By default, it will play videos and images, but if you need to play only images, you can change the “media_type” in “/opt/lomorage/var/video_looper.ini”:
sudo sed -i "s/media_type =.*/media_type = image/" /opt/lomorage/var/video_looper.ini
or play only video:
sudo sed -i "s/media_type =.*/media_type = video/" /opt/lomorage/var/video_looper.ini
or restore to play all media assets:
sudo sed -i "s/media_type =.*/media_type = all/" /opt/lomorage/var/video_looper.ini
Keyboard control #
If you have keyboard connect with Raspberry Pi, you can press the following key to control:
“r”: rescan playlist.
“k”: skip to next.
“s”: pause/resume play
“esc”: quit Lomo-frame
Setup multiple digital frame #
This setup need some expertise, sorry, will make it easier in the future using phone APP.
If you already have one Raspberry Pi (Primary Raspberry Pi) setup for running “Lomorage Photo Assistant”, and having all the hard drivers connected with that device, you probably keep it in the storage room connected to the router with wired network, and want to setup the digital frame in bedroom or living room.
You can use a low cost Raspberry Pi zero w to setup the digital frame and access your digital assets via WiFi, it works pretty well, the video playback is very smooth.
- Install Lomo-frame
You can follow the instructions on the top of the page.
- Setup WiFi connection
Connect keyboard with Raspberry Pi zero W and login, if you installed Lomorage Raspberry Pi OS image, the default user name is “lomoware” and password is “lomorage”, you can use the command wifi_switch.sh client [wifi-ssid] [wifi-password], replace “[wifi-ssid]” and “[wifi-password]” with those of your wifi network; otherwise, you can refer to other docs online to set the WiFi connection.
- Check IP address of primary Raspberry Pi
You can find the IP address using iPhone APP, in “settings” tab, section “LOCAL SERVICE”, the host field is the IP address.
- Find the mount directory on primary Raspberry Pi
You can mount the “media” directory on primary Raspberry Pi onto your desktop/laptop via SAMBA, with user name “pi” and password “raspberry”, and you will find the directory name store media assets mounted under “media” directory.
- Mount on Raspberry Pi zero w
Say if directory with name “/media/WD_90C27F73C27F5C82” store media assets mounted on primary Raspberry Pi (with IP 192.168.1.155), you can mount it on your Raspberry Pi zero w, login to Raspberry Pi zero and then:
sudo mkdir /media/WD_90C27F73C27F5C82
echo "//192.168.1.124/media/WD_90C27F73C27F5C82  /media/WD_90C27F73C27F5C82  cifs  user=pi,pass=raspberry,uid=1000,gid=1000" | sudo tee -a /etc/fstab
sudo mount -a
- Reboot
sudo reboot
After reboot, you should be able to see it starts scanning the media files to generate playlist.